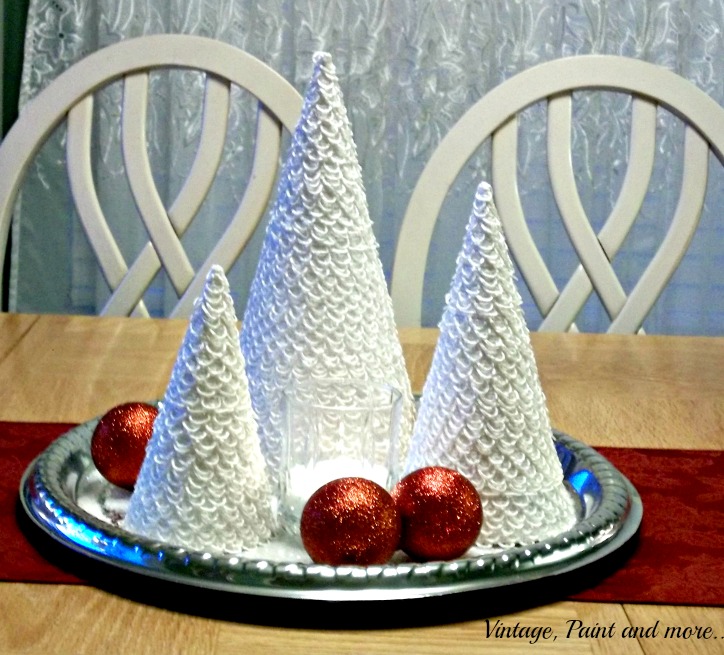
What a beautiful sunny day it is here today. After all the rain the past few days it is glorious to see the sun again. I have been busily making some Christmas decorations and want to show you these little white trees I just finished.
Aren't they just the cutest. I have fallen in love or should I say obsession with these little trees. I was seeing them all over Pinterest and blogland made out of all sorts of things. I just had to have some. So, I kinda went crazy with them.
These sit on my dining room table. I made them three different sizes 12", 8" and 6". Then I placed them on a round silver tray ( from Dollar Tree, of course) with Epsom salt and glitter "snow'. Added a juice glass votive and a few red balls and wallah - a very cute centerpiece...
Love it - easy, peasy.... and
they are quite simple to make.
I used the 12x12 light weight chipboard that comes in packets of scrapbook paper, ( I had several left over from my store days) but you can use poster board just as easily.
I cut each of them into this shape. Stay with me while I explain ( there is probably an easier way to do this but this is the only way I could do it to have an even tree.)
I made a homemade protractor with a straight pin, a piece of 14" string and a pencil. Tie the string onto the pencil then measure out 12" from the pencil to the end and place your straight pin through the string at the 12" mark. Cut off any excess.
Then pin your straight pin into one of the corners of the square. Pull your string taut and draw the semi circle from one corner to the next. Cut this out.
And you have this shape. Now to make more of the same size use this as your template.
Now, you just tape the two straight edges together to make a cone like the one above. ( I forgot to take a pic of the taped cone before I started adding stuff to it) You can see several of them in the background. If they are a bit lopsided just shape them or trim them to the look you want. To make different sizes I just cut however much I wanted off the curved edge. Careful though, these can become quite addictive to make.....
On these I used buttonholing. ( They use it to make those dresses with a thousand buttons going down the back.) I got it in my sister's fabric store when I was visiting over Thanksgiving.
I just started at the bottom and hot glued it around the cone making sure each row sat directly above the previous row. To start it I hot glued the end on the inside of the cone. When I reached the very top I cut it and threaded the end down the top hole and glued it to the inside of the cone.
This is a closer look at the way the loops drape over each other. And you can also see the top of this one.
I just love these little trees they are so darn cute.... and stay tuned there are lots more to come because after making these. I searched the house and came up with a couple or about a dozen more of them made in all sorts of materials. I'm telling you they are addictive!
Would be thrilled to hear from you. Just leave a comment below and I will answer you through email.
Until next time - enjoy creating something you love.
Cathy
Click here to see the parties I am linking to this week.
Please visit them and see all the great projects and inspiration found there....


I love them! Isn't it great to have a sis that has so much fun stuff to play with!!! <3
ReplyDeleteI always have fun going there just to see what I can find to do for my next project. But, alas, now I'm too far away. Have to find a new hangout.....
Deleteso pretty!
ReplyDeleteThank you so much and thank you foe stopping by...
DeleteYour trees are so pretty!!!
ReplyDeleteDee
Thank you - I do love the way they turned out....
DeleteYour little white trees are beautiful. What a nice vignette. Great tutorial too.
ReplyDeleteThank you so much - very simple to put together and I love it. I'm glad you liked the tutorial.
DeleteYour fiber trees are darling- so Victorian! I think they are perfect for shabby chic romantic Christmas decor. Found you at the Christmas linky- a new follower, A
ReplyDeleteVery elegant looking. I was wondering the height of the 2 smaller trees & "how many yards "would I have to purchase. I have never heard of this product but yes as I look at it I see what they use it for.
ReplyDeleteThey are so unusual looking, I will have to make it.
IToo fell in love with these buttonhole trees. purchased what I thought enough button eyelet for a very small tree, it took it all then you wont mind the cost but $15 dollars to make most 15 yards of the stuff and cost way on there so if you truly want it and sure is pretty when finished then go for itmine were as pretty as your.Susie
ReplyDelete