This post may contain affiliate links
Last year I made a rather large book page wreath to hang over our mantel. Today I am going to share the tutorial of how to make this simple wreath from an old book.
I am a lover of old books and words printed on almost anything so it was a given that I would fall in love with this book page wreath when I saw it on the internet. I have had many requests for the instructions but alas, I have not been able to find the website I read it on. So, today I am going to share my own tutorial for making this gorgeous wreath with all of you. But, beware this post is picture heavy so I could show you each step.
So, let's get to it....
You will need:
- An old book preferably with some brown discolored aging
going on - on the edges of the pages.- I used this old Reader's Digest Condensed Books Book given to me.
- stapler
- glue gun and glue sticks
- about a 10" piece of twine
- a piece of foam core (I got mine at Dollar Tree)
First, tear about 75 pages out of your book.
Fold each page into a cone and staple at the bottom.
When you are done you should have a bunch of cones like this.
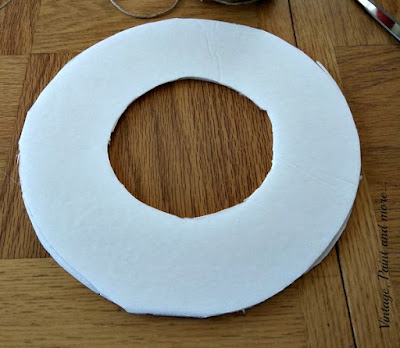
Next, draw your base onto the foam core. I used a 9" dinner plate for the large circle and a small bowl for the center.
Cut it out with an Exacto knife. It doesn't have to be perfect - you will not see any of this when done.
Take your piece of twine and tie it around your form for a hanger. I tied it on both sides for stability.
Now, we start the first row. Using hot glue - glue your cones facing down onto the form.
This is actually the back of your wreath and will make sense as we proceed.
Continue gluing them all the way around the circle.
It will look like this when you finish this row.
Turn it over now so it looks like this and we will start the second row. This back row helps cover the foam core and gives it some of its fullness.
The second row is glued on so that each cone is actually sitting in the little space made by two cone meeting on the back row.
Keep gluing all around the form. It will look like this when done. Not too lovely but, getting there.
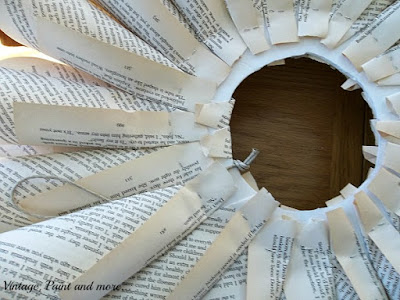
On the third row you continue to glue in the same manner as the last row. However, place the cone so that it hangs over into the circle in the center. This will give you the shape of the wreath.
The tabs that are hanging over into the circle will be folded over and glued down on the back as above.
The back will look like this when you are done with row three.
For the last row glue the back of the cone and then place it on the cones in the previous row.
Just attach it to the cones. You will have a longer tab in the circle this time.
You can see here I have two in this row right now just continue around the circle placing them in this manner.
Again on the back side of the wreath - fold the tabs of the cones back and glue in place.
The back will look like this. Very neat with every tab glued down so they do not show from the front.
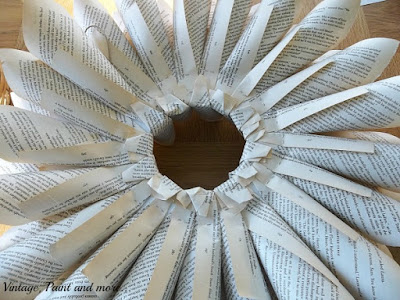
The front will look like this. ( For some reason the sun shining in makes it look pinkish in this picture) This is much smaller than the first one I made.
The first one I made had seven rows of cones.
Here it is over our mantel last Christmas. It is large and makes quite a statement all on its own....
I made this one smaller as it is headed to the church for an auction this weekend and most people do not have a space for a large one like the first one. This one is the size of a regular wreath I actually made two of these in one afternoon. They are so easy and take very little time. So what do you think? Think you may try your own?
Until next time have a great day and create something you love....


I love it!! Such a great tutorial, pinning! I would love it if you shared at our wowza weekend link party!!
ReplyDeleteThis is so pretty! I may have to find a book to tear apart!
ReplyDeleteCathy this is so pretty and thank your for the great detailed tutorial. I think after reading this I could make one of these wreaths for sure! Thanks for linking up to TTF!
ReplyDeleteBeautiful! Looks awesome over your mantel.
ReplyDeleteI love how your paper wreath turned out! & thanks for sharing how you made it. Theresa @DearCreatives
ReplyDeleteI've been wanting to make one of these for some time. I have the perfect book for this. Thanks for sharing how inexpensive and easy it is!!!
ReplyDeleteHi what a beautiful job you did making this wreath, so pretty. I saw it on lemon paper design. Julie at julieslifestyle.blogspot.com
ReplyDeletebeautiful job!
ReplyDeleteSo pretty and what an amazing tutorial! Visiting from Nifty Thrifty :) Have a great Sunday!
ReplyDeleteIt looks like you spent hours on this wreath but after going through your excellent tutorial, I have to try this. You make it look so easy! How pretty and unique! Visiting from A Bouquet of Talent Link Party!
ReplyDeleteGreat tutorial! I would love to try and make it this year!
ReplyDeleteI've been meaning to make one, and have a few tutorials pinned but yours is really good and easy to follow! Thank you! Julia
ReplyDeleteI have been wondering how to make one of these gorgeous wreaths! Pinning to make one for later!
ReplyDeleteElizabeth @ Real Inspired
SO AWESOME! I love how this turned out. It probably took a lot of patience, but it turned out great. Thanks so much for linking up to The DIY'ers!
ReplyDeleteI have been wanting to make one of these for a long time. Yours looks beautiful. I would love for you to come and link this up to my Fall into Fall party that opens each Tuesday night at 8pm EST. Hope
ReplyDeleteThis is so beautiful, Cathy! Such a creative way to use book pages. I'm one of the many you can add to your list of people who have fallen in love with your wreath!
ReplyDeleteWould love if you linked this up at the Handmade Holiday Party :). Hope to see you there! http://www.homeyohmy.com/handmade-holiday-link-party/
Ilove your wreath and such a fabulous detailed tutorial too. Thanks tons for linking to Inspire Me. Hugs, Marty
ReplyDeleteLove that you included step by step pics to really show how this can be created. Great 'up-cycle' way to use old books. Beautiful.
ReplyDeleteThis is so pretty. Thanks for sharing at the Handmade Holiday Link Party.
ReplyDeleteThis is a beautiful wreath, I have seen similar ones but was looking for a tutorial. Your pictures are very helpful, i will be pinning and trying this soon! Thanks for sharing.
ReplyDeleteCathy, I love it! I made one for Christmas and one for Valentines a couple years ago. I attached them a bit differently. Gave it a little different look. I like how you turned it over and tucked them underneath. I applied all of mine to the front. Thanks for sharing with SYC.
ReplyDeletehugs,
Jann
That is fantastic. I am making one of these in 2014 for sure. It is on my to do list. Love it. Thanks for sharing.
ReplyDeleteAbsolutely FABULOUS!!!! LOVE it and thanks for sharing! : ) hugs...
ReplyDeleteOh wow!!! I love this!
ReplyDeleteWhat a great idea to use book pages!
Beautiful work. Featured and PINNED! Linda
ReplyDeleteStunning! Love the recycling aspect of this art! Thank you for sharing at our TGIF Link Party at A Peek Into My Paradise! Your post is featured at this weeks party I can’t wait to see what you share this week! I am currently accepting posts for themed bloggers showcase/roundups and would love for you to participate! Go here for the details and to join in on the fun! http://apeekintomyparadise.com/bloggers-showcase-submissions Cathy @ http://apeekintomyparadise.com
ReplyDeleteThat is quite possibly the best book page wreath tutorial I've seen. Thanks for all of the pictures!
ReplyDeleteYes, I am going to make one. I am so appreciative of your photo tutorial. Makes so much more sense. Thank you!
ReplyDeleteHi stopping by to let you know you have been featured this week at One More Time Events…. Hope you can join in again this week….Thank you for sharing…Tammy
ReplyDeleteSo pretty! I love making these wreaths! Thanks for sharing at Silver Pennies Sundays! x
ReplyDeleteThis is beautiful - thanks for the great tutorial!
ReplyDelete
ReplyDeleteHi! I wanted to let you know that your beautiful book wreath is being featured this week by one of the co-hosts of the Link It or Lump it Party! Come on over and grab a ‘I was featured’ button and don’t forget to link up again! http://www.twoityourself.blogspot.com/2013/11/link-it-or-lump-it-link-party-15-plus.html#more – Melissa @ Two It Yourself
Really beautiful Cathy! Recycling at it's best!
ReplyDeleteGreat tutorial! Thank you so much for sharing. I have made some book wreaths. I really like the way you have made yours. It seems so much easier than how I have been doing it. Linda
ReplyDeletethis is a great tutorial - I've made the wreaths - but never taken the time to do this --- I'mm pinning to my "paper" board.
ReplyDeleteI have been saving this tutorial for the proper time, and yesterday I found an old damaged hymnal for $3. It took me all afternoon to make the wreath; however, I am so absolutely thrilled with it. Thank you again for your inspiring blog!
ReplyDeleteI'm going to hobby lobby to find me a book with loud colors : I love this wreath. can"t find the print button.
ReplyDeleteCathy! Thank you for sharing. I have a huge wall and wanted to make some shelves out of books. This would be awesome next to the shelves. I was wondering how large your foam base was and if you did one layer on the backside for the larger one?
ReplyDeleteThis is actually foam core that you buy for projects at the hobby and craft stores - they also sell it at Dollar Tree if there is one close to you. I used a 9" dinner plate to draw my circle to cut the base. The center was a small bowl we have so that the form is probably about 4" wide. This make a very large wreath and easily will be the main focus of any wall.
DeleteIs the 9 inch circle for the small or large wreath indoor tutorial? If its for the small, how big was the foam circle you used for the large wreath with 7 layers?
ReplyDeleteLove this art project!! I would like to try making both sizes (the 4 row and the 7 row)...what measurements do you suggest for the 7 row wreath, and is there anything else you do differently?
ReplyDeleteI totally live this wreath!! Your pictures are so helpful!
ReplyDeleteFortunately I help out at our library and can have as many discarded books as I want....I was looking for something beautiful to do with them and this is perfect! I'm going to display one in the library case and maybe make some heart shaped ones for Valentine's Day!!!♡
Has anyone had any luck with "sealing" the pages to keep them from wilting in humidity?
ReplyDeletethanks for your GREAT instructions and pictures! this is my next project.
ReplyDelete