This post was made in collaboration with Walnut Hallow. All opinions are 100% my own.
Good morning friends.
I am so glad you have stopped by today because I have a real treat for you. I have joined up with several other bloggers to participate in the Create and Share Monthly DIY Challenge hosted by Stephanie at Casa Watkins .
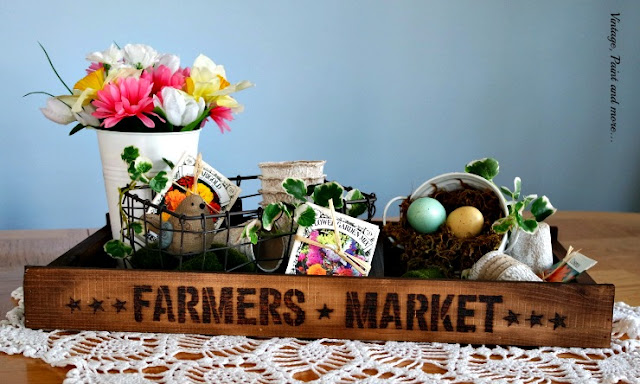
We were each given a wood item and a woodburning tool by Walnut Hallow and the instructions to complete it in any way we chose. I decided on their pallet tray and transformed it into the tray below.
I am in love with the way it turned out - so vintage looking and perfect to hold a few Spring related items to make a wonderful vintage Spring centerpiece for our dining room table. Let me show you how I did this transformation.
First of all - Walnut Hallow is a company that specializes in unfinished wood pieces and the supplies to finish them as you choose. I chose to use their Rustic Pallet Tray for this and they sent a woodburning tool for me to try out. I have never done any woodburning and was excited to learn how to do it. I turned to Pinterest and read several articles about how to use the tool itself and then practiced with it on a piece of scrap lumber. I found that it was quite easy, very relaxing and a lot like coloring only with a very hot tool instead of markers.
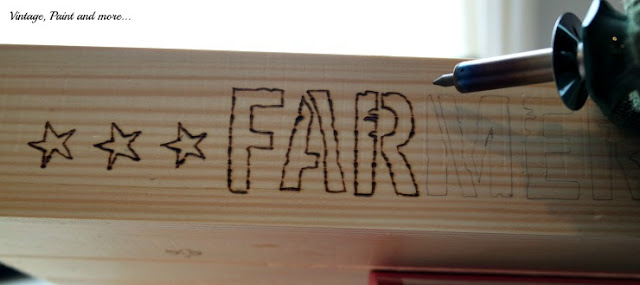
I decided to make my tray into something vintage - surprise. I chose a Folkart stencil to use for my lettering. First of all I traced the words I wanted onto the sides of the tray with a pencil.
Then I used the woodburning tool to begin tracing each line. After I had burned a letter outline I then decided to fill in each letter with solid burning. I used the pointed tip for all my woodburning. But the tool comes with 4 different tips and I can't wait to come up with some other projects to try them all out on.
Then I used Johnson's Dark Walnut stain to stain the entire tray. I applied it lightly at first and then darkened it around the edges and in some areas I thought it would have shown more wear had it been around for several years. I love how it turned out - so vintage looking.
I then filled it with some Spring related items I had sitting around the house (specifically in my craft closet). A painted bucket with a bird nest and eggs, some painted peat pots, a wire basket, some flower seed packets and a few "faux" spring flowers and ivy to complete the look. Sitting on the vintage crochet doily just completes that vintage look I was going for.
This is a view of one end of the tray as I wanted it to resemble an old vegetable or fruit crate you would have found at a Farmer's Market.
This is a view of the other end of the tray. I think it actually looks as though it has been around for years.
Loving this "vintage" tray and how it completes my Spring centerpiece.
Thank you Stephanie and Walnut Hallow for the opportunity to participate in this very fun challenge.
Be sure to visit all the other bloggers and see their great projects - just click on the links below to be amazed. And if you want to try your hand at a new craft - check out Walnut Hallow and their great selection of wood products.
What do you think? Maybe a woodburning project is in your future?
Until next time create something you love.
Pallet Tray Projects
Casa Watkins: DIY Succulent Garden Dry Erase Board
Pocketful Of Posies: DIY Military Coin Shadow Box
Vintage Romance Style: Easy DIY Laptop Stand
Shabby Grace Blog: Herb Garden Tray
Vintage Paint and More: DIY Vintage Pallet Tray
Domicile 37: Electronics Tray
Iris Nacole: Bohemian Tray
Lovely Etc: Simple Pallet Photo Display
The Southern Couture: How To Decorate Your Home For Every Season
Green With Decor: Decorating The Bathroom Walls
Medium Basswood Round
Run To Radiance: Faux Succulent Centerpiece DIY
A Shade of Teal: DIY Clock
One Mile Home Style: Golden Home Sweet Home Wall Art
Flourish & Knot: Monogrammed Cheese Board
Lehman Lane: DIY Rustic Boy's Room Sign
Knock It Off Kim: Rustic Treat Stand
Farmhouse 40: Wood Open Sign
DIY Beautify: Wood Slice Clock
Creatively Homespun: DIY Children's Step Stool
Chatfield Court: DIY House Numbers
Large Round Clock
Monica Wants It: Gold Polka Dot Clock
The Twin Cedars: DIY Lazy Susan
Tastefully Frugal: DIY Drum Clock
Uncookie Cutter: Tabletop Clock
The House Down The Lane: Kid's Art Cheese Tray
Refashionably Late: Stenciled Clock
Homeology: Rustic Modern Wall Clock
My Life From Home: DIY Baseball Clock
Old House To New Home: DIY Stenciled Clock


Wow!! What a great project!! Love it!!
ReplyDeleteHugs,
Debbie
Thank you so much Debbie - I certainly had a great time making it.
DeleteI love this tray so much. The vintage look is one of my favorite.
ReplyDeleteThank you so much - vintage is my cup of tea also.
DeleteI love the rustic look of your pallet tray Cathy! Thank you for sharing! Pinning!
ReplyDeleteI hear you Cat - rustic is right up my alley - the more rustic the better!
DeleteI'm not gonna lie, when I first saw the collage of projects, my eyes went right to yours!!! Wow. This is so cute and staining the edges darker was the perfect touch!
ReplyDeleteThank you so much - when I started staining it I thought I was in trouble but I love the way the stain took to the wood. Perfectly vintage in my book.
DeleteSo cute, and I'm impressed with your lettering!
ReplyDeleteThank you so much Iris.
DeleteThis is so cute, Cathy! I've been looking for a vintage farmhouse style tray for more than a year. You've inspired me to DIY it! :)
ReplyDeleteOh, I am so glad you like it and hope you have as much fun diying yours as I did this one.
DeleteSo cute Cathy!!! I love the burned lettering and this is a perfect spring time project. Thanks so much for participating in this month's challenge
ReplyDeleteThank you so much Stephanie - I have to say I thoroughly enjoyed joining in with this challenge - thank you for arranging it and co hosting it.
DeleteI love this tray so much!! I was too afraid to try the burning tool, but will need to pull mine out now. Thanks for the inspiration!
ReplyDeleteOh, you have to try the burning tool. I was a little intimidated also with using it but when I started I found it was so much fun. I will definitely be using it again in the future.
DeleteWow, Cathy,your tray looks awesome. I love the lettering and the stain you used. You are a natural at wood burning. :)
ReplyDeleteThank you so much. It was my first time ever wood burning anything but had a great time doing it.
DeleteWow! Beautiful and what a unique piece! I love it, Jess!
ReplyDeleteI mean Cathy, haha!
DeleteI love the rustic beauty of it. Well done :-)
ReplyDeleteAmalia
xo
Thank you.
DeleteAwesome job! This truly does look vintage - I will definitely be pinning to remember this techique.
ReplyDeleteThank you so much and thank you for pinning it.
DeleteWow, that brings back memories ... I had a wood burning kit when I was a young girl :D You did an awesome job on your crate -- it really looks vintage! TAke care, Cynthia
ReplyDeleteThank you Cynthia. I never had a wood burning tool but now I know I was missing out on a lot of fun.
DeleteWhat a cute project! You did a fantastic job, I love the rustic style. I haven't done in wood burning in a while, may just have to break it out again.
ReplyDeleteThank you so much Linda - I am so in love with the rustic look myself.
DeleteLove the farmhouse look! Pinned! Great job!
ReplyDeleteThank you Meghan.
DeleteI think Hubby actually has a wood burner tool downstairs. I might just have to go on the prowl in his tool room! Love this idea, it turned out great!
ReplyDeleteOh Christine. Do go and find that wood burning tool - it's so much fun to use and I know you'll love it.
DeleteYour pallet tray is both rustic and charming. Love the way you styled it.
ReplyDeleteThank you Sharon.
DeleteSuch a great pallet tray Cathy!!!! Love the farmers market text and you did such a great job burning it!!!
ReplyDeleteThank you so much Tara - I love that stencil and will probably use it on a few other things, lol. Thanks for stopping by.
DeleteCathy, I adore your project - so realistic! I think you're a natural at this!
ReplyDeleteThanks so much Sarah. This was my first time to try it but, I'm sure it won't be my last time.
ReplyDeleteHi Cathy--I've enjoyed using this same stencil on many different projects--it's a good one. I would never in a million years have thought of use it for a wood burning project, though--very clever! I might have to give it a try myself. Thanks for sharing it with us all at Vintage Charm :)
ReplyDeleteYour tray turned out so good, especially the wood burned letters.
ReplyDeleteOh this is just TOO cute!
ReplyDeleteI would love for you to share this at my Facebook Group for Recipes, Crafts, and Tips and Tricks!! https://www.facebook.com/groups/pluckyrecipescraftstips/
Thanks for joining Cooking and Crafting with J & J!
This is adorable. Thanks for sharing at Merry Monday! :)
ReplyDelete