Can you believe it's the middle of October already? It seems like time is flying by so fast. Soon it will be time to start decorating for the holidays. While many of you are enjoying fun Fall activities such as hayrides, pumpkin farms and corn mazes we are still having summer temps and Miss A and her friends spent yesterday at the pool. But, the weatherman promises we will have some fall temps in the next couple of days. I can hardly wait. Well, so much for the weather let's get on with today's project.
Aren't these little guys the cutest? My sister owns a fabric store and every once in a while she sends me some sort of cool item along with a challenge to see if I can come up with an idea using whatever she has sent. So this time it's buttonhole trim. I'm sure you've seen it - on the backs of wedding gowns and prom dresses. It's the loops that are used to button all those tiny little satin covered buttons on those beautiful long backs. I've used it before - you can see those projects here and here. So for fall, I decided to wrap this trim around a little dollar store pumpkin. I think they turned out really cute and it takes such a short time to make one that you can have a whole patch made in an afternoon.
This post contains affiliate links for your convenience to help you find the supplies needed for this project. I make a small commission if you purchase through my links, but it doesn’t add anything additional to the cost to your purchase. Your purchases through my links helps me continue blogging and providing you with free content. If you do purchase through my links, thank you!
You will need:
- 7 yards of buttonhole trim ( I used the trim found here
- small dollar store pumpkin about 6"
- glue gun and glue sticks
- twine
- (the pumpkin can be painted white before you start to make sure no orange shows through)
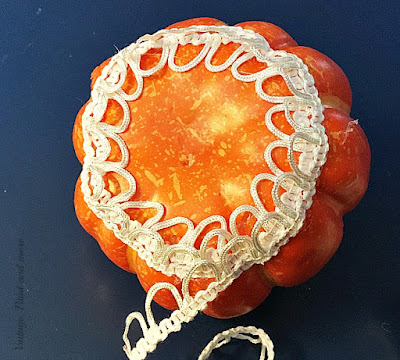
This is really a very easy process to make this little pumpkin. I simply started by gluing the buttonhole trim in a circle on the bottom of the pumpkin as shown above. I didn't cover the bottom completely but you can if you like.
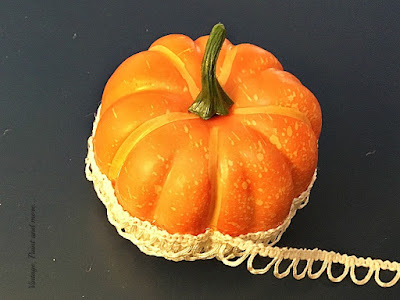
Continue gluing the trim around that circle trying to keep the edge of the trim butted up against the edge of the previous row so there is no orange showing. Continue going around the pumpkin, gluing the trim on and matching the edges. The following pictures show the progress.
When you are done it should look like the above picture.
The next step is to cover the stem. I started at the base of the stem with twine and simply wound the twine around the stem gluing it occasionally to keep it in place.
Next, I cut a single strand of twine and tied it around the base of the stem to make it look like a bit of vine, trimming it to the length I liked.
Here they are all done in a small vignette with the cutest little Gather sign I received as a gift for my birthday a couple weeks ago. I love the vintage, lacy look these have. They can be used in so many different vignettes - vintage, rustic, all white, shabby chic - so versatile.
Are you still making Fall projects like me or have you moved on to the holidays? I am making my plans for my holiday decorating and gathering my supplies but, I have yet to start any projects. I love to hear from you all so tell me about what you are doing in the comments below.
If you like this and don't want to miss any posts sign up for my email in the box at the top and get all my posts delivered straight to your mailbox.
Until next time have fun creating something you love.
I will be adding this post to the parties listed on the Where I Party page. Please visit them so you don't miss any of the great projects and inspiration found at each one.
If you like this post you may also like these:


Cute! I love pumpkins -- the more the merrier!
ReplyDeleteThank you. I have to agree the more pumpkins the merrier
DeleteThose really are the cutest!
ReplyDeleteThank you.
DeleteI love these! What a unique look for pumpkins for the fall. Thanks for sharing at Snickerdoodle, Cathy. Pinning.
ReplyDeleteThank you, Beverly and thank you for hosting each week and pinning this. Love your party.
ReplyDeleteSuper pretty! Love the lace you used. Visiting from We Are Pinnable party.
ReplyDeleteWhat a clever idea, they are so pretty. I must share on my social media. Hugs, Linda on Poinsettia Drive poinsettiadr.com
ReplyDeleteThank you so much Linda and thank you for sharing.
DeleteThese are adorable and elegant. I like to extend my pumpkins into Christmas by painting them, but this is even better!
ReplyDeleteThank you so much - what a great idea to use them until Christmas.
DeleteAdorable; I never would have thought of that! I am busy making cloth pumpkins from GW thrifted $1 clothes and am having such fun! Been making holiday stuff for our church bazaar all year; make myself crazy as Christmas approaches so I'd rather start early with decorations, knit scarves, and Epsom bath salts, sachets, soaps, etc. to go into gift baskets!
ReplyDeleteI made some fabric ones from scraps of fabric I had here - they are fun to make - each one is so different. Sounds like you are a very busy lady making all that for your church bazaar. Hope it is quite successful.
DeleteCute cute cute! I would never have come up with that idea.
ReplyDelete:) gwingal
Thank you, Nikki.
DeleteVery cute pumpkins. Thank you for sharing at Snickerdoodle. Pinning
ReplyDeleteThank you Sharon.
DeleteThese are beautiful! Thanks for sharing at The Blogger's Pit Stop! Roseann from www.thisautoimmunelife.com
ReplyDeleteThank you so much, Roseann.
DeleteThese are just too stinkin' cute! Thanks for sharing.
ReplyDeleteThe pumpkins look great and what a clever idea to use buttonhole trim
ReplyDeleteThank you Amber.
DeleteUsing the lace trim was such a creative idea! Thanks for sharing at Vintage Charm--pinned!
ReplyDeleteThank you so much, Cecelia
DeleteWow, I can't believe how pretty these look Cathy. I would never have thought of using buttonhole trim to decorate a pumkin, but it works so beautifully
ReplyDeleteThank you, Michelle. I probably wouldn't have used it if my sister hadn't challenged me.
DeleteSuch a beautiful idea. Love these :) Thanks for sharing at Creative Mondays last week. Pinned and featured this week at the blog hop/
ReplyDeleteThank you so much and thank you for pinning and the feature.
DeleteThank you for sharing this pretty and creative diy at TGFT, pinned. Hugs!
ReplyDeleteThank you so much and thank you for pinning.
DeleteI love these! I wore my mother's wedding dress and the entire back was buttons all the way down! Never would have thought to use the trim:) xo Kathleen|Our Hopeful Home
ReplyDeleteMy sister owns a dress store and a lot of the dresses utilize this trim. But it's fun to come up with new ideas for its use. Thanks for stopping by Kathleen.
DeleteThey are so cute and such a unique idea! Thanks so much for sharing on Party in Your PJ's. Pinned!
ReplyDeleteThank you and thank you for hosting.
DeleteReally fun Cathy, I love them by your sign! Thanks for sharing with SYC.
ReplyDeletehugs,
Jann
Thank you Jann.
DeleteThose are so darling! I love the lace. Pinned.
ReplyDeleteThank you for pinning.
DeleteHi Cathy, I'm late at starting the party, but you will be featured at SYC this week.
ReplyDeletehugs,
Jann
Thank you so much for the feature and for hosting each week.
DeleteGood morning! Thanks for linking up last week to the Thursday Favorite Things Blog Hop and Linky Party . . . I featured this post today for this week's party, and would love to have you stop by and see some of the other features from last week and link up again this week. Be sure to leave a comment and your link # so we can feature you again at an upcoming party! Thanks again, Nina @ Vintage Mama's Cottage
ReplyDeleteHere's the link to this week's party where you are featured: http://vintagemamascottage.com/2017/10/26/favorite-features-from-the-favorite-things-party/
Thank you so much for the feature and for hosting each week. So glad to check it out.
DeleteThese are so pretty! Thanks for sharing at the #inspirationspotlight party. Stopping by to let you know your post has been shared & pinned.
ReplyDeleteThank you so much Theresa and thank you for pinning.
DeleteHi Cathy! I absolutely love these vintage pumpkins. That sign is adorable as well! Thank you so much for sharing with us at Dishing It & Digging It & congratulations on being featured this week!
ReplyDelete